


Lamination of eyelashes is the most effective way to get a wow effect and a natural curl. This is a worthy alternative to mascara and not quite harmless artificial eyelash extensions. We are used to doing this beauty treatment in salons, but it can also be done at home. We at Joy-pup will tell you how to laminate eyelashes at home.
Lamination of eyelashes – what is it?
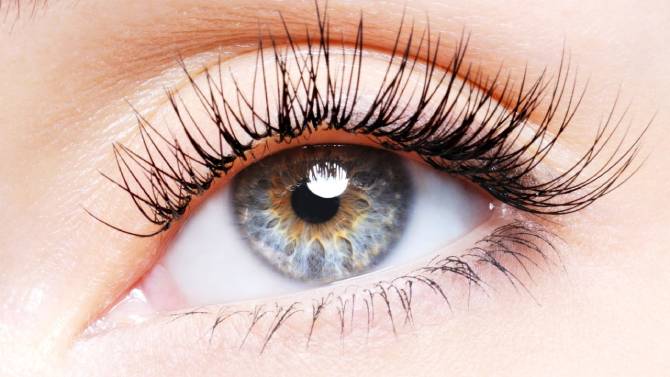
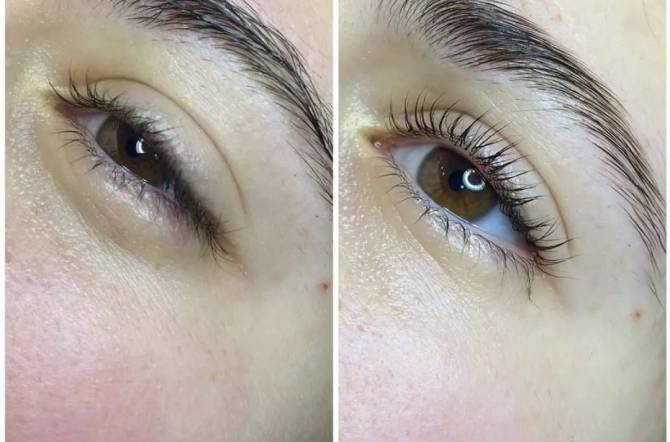
How nice it is to wake up every morning with long, curled eyelashes and save time when applying makeup. Thanks to this beauty procedure, you will be able to sleep a little longer with peace of mind. Lamination strengthens and lifts your own eyelashes, gives them a magnificent curl, the effect lasts up to eight weeks. The compositions for lamination include nutrients that nourish the cilia from the inside. This method has almost no side effects and is especially recommended for short, weak and light eyelashes. If you want to enhance your look, you can apply mascara.
The procedure is performed by the master in the salon, but it can also be performed at home. Specialty stores sell laminating kits that are suitable for home use. These are the brands Sexy Lamination, Yumi Lashes, Paul Mitchell, Novel Lash Up.
Advantages of eyelash lamination:
- Deeply cares for and strengthens natural eyelashes.
- Accelerates growth and activates hair follicles.
- Eyelashes look fuller, voluminous, shiny.
- Long lasting effect.
- Excellent curl.
- Eyelashes fall out less.
Eyelash lamination step by step
If you are not a professional in eyelash extensions, a training video will help you. When performing the procedure at home, greater importance should be given to accuracy and cleanliness.
- Clean your lashes of make-up and impurities with micellar water or another oil-free cleanser.
- Close the lower eyelid with a hydrogel patch.
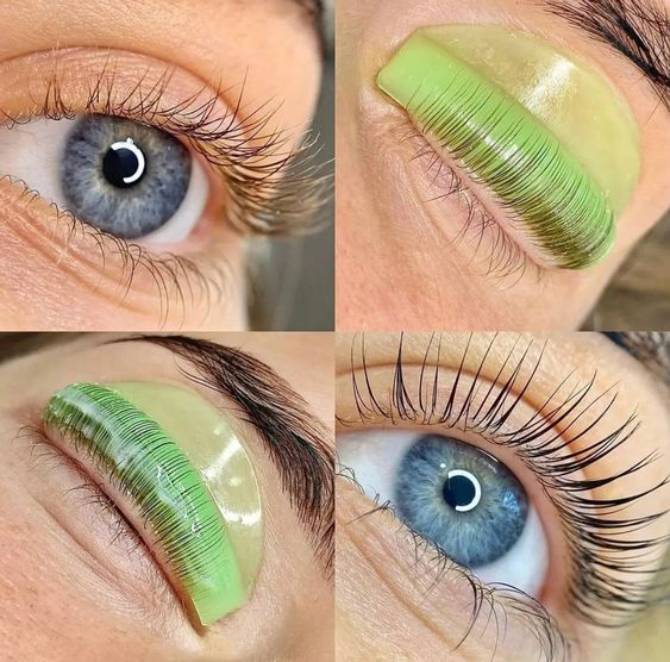
- Pick up a roller of a certain size (S, M, L), apply eyelash glue on the back side. Let the glue dry for 60 seconds, then stick the roller on the upper eyelid and press for a minute.
- Apply glue to the roller and lay out the lashes on it with curved tweezers.
- Apply lash softener #1 to your lashes and cover them with a thin strip of cling film for 12 minutes to intensify the effect.
- We remove the product with a dry cotton swab, apply composition No. 2, which gives the eyelashes a bend and again cover with cling film for 12 minutes.
- We remove the composition No. 2 with a cotton swab, we stain the eyelashes with paint.
- We remove the paint with a dry cotton swab, apply composition No. 3, which nourishes, envelops and closes the scales of the eyelashes.
Important: For optimal results, avoid contact of eyelashes with water for 24 hours after application!

Only registered users can leave comments